Live Racks
Max for Live devices
-
Services
- Mastering
- Max for Live development
- Tuition, workshops, consultancy
-
Live Racks
- AD2 Suite
- SD Suite
- Textures
- Channel Strip
-
Max for Live devices
- LivePlayState
- LiveTime
- LFO MIDI
- YouTube Channel
- Blog
- Contact
SD Suite Manual
Table of contents
1
Introduction
Thank you for checking out SD Suite! In this guide you’ll find all the information you may need to use SD Suite, whether it’s for basic use or for customisation and better understanding of internal MIDI and audio handling. On the bottom of each chapter that covers a device, there is a paragraph in which is explained what’s inside the device that makes it work the way it does.
SD Suite is basically a toolbox that allows you to interact with Session Drums presets in a different and more convenient way. Use Push to insert or record notes into the Drum Rack sequencer with a clear overview of all the kit pieces by colour. Instead of setting velocity values manually in MIDI clips the old fashioned way, use simple Macros to control the velocity values that are sent into the Drum Rack in real time, or through automation. To add extra liveliness to the drums, you can let the Ghost Note Generator come up with ghost notes for you.
2
Installation
To start using SD Suite, unpack the .alp file somewhere in your User Library, or in one of your custom folders in Live’s Browser. From here you can easily access the project folder, unfold it, and import the desired presets into your existing project.
- The
.alpfile does not include the samples from the Session Drums packs. Therefore, make sure the packs are installed before using SD Suite. - Only the Ghost Note Generator uses a Max for Live device:
LFO MIDI.amxd. This plug-in is a modification of the Core Library LFO, allowing it live in a MIDI signal chain. The plug-in is included in the project folder.
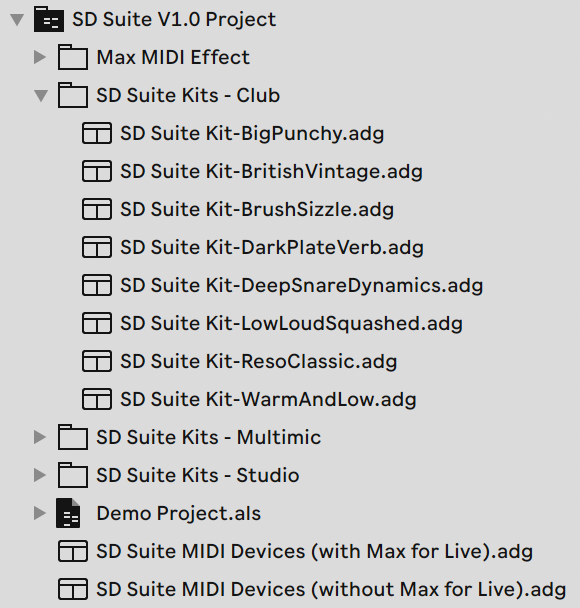
The SD Suite project folder contains one demo project file, two presets for the SD Suite MIDI devices; one for users who own Max for Live, and one for the users who do not, and three folders containing all the presets for the three Session Drums packs.
Using SD Suite
Step 1:
- Depending on whether you have Max for Live or not, drag one of the two SD Suite MIDI Devices presets (listed at the bottom) onto a MIDI channel.
Step 2:
- Option One: From one of the three SD Suite Kits folders, drag a desired drumkit onto the same MIDI channel.
- Option Two: From one of the original Session Drums packs, drag a desired preset onto the same MIDI channel. The upside here is that you can listen to previews of the presets, but the downside is that the presets do not have the corresponding coloured channels.
You’re now ready to start playing.
Updates
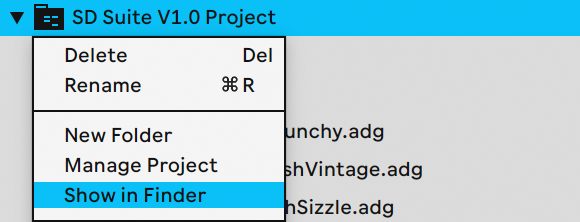
Every now and then SoundSuite’s devices receive updates. To check if you’re still on the latest version, right click SD Suite’s project folder and click Show in Finder/Explorer. Once the folder is revealed, double click the www-Check For Updates.url file.
Customization
To ensure that all of SD Suite’s devices will work correctly, it’s best to keep the Drum Rack pads where they are, as otherwise you will have to change the mapping for all the other devices as well. Please read the rest of the manual to find out where the MIDI routing happens inside all of the devices, so they can be modified accordingly.
There is also a video on YouTube where I explain how the very similar AD2 Suite works and how to make your own Drum Rack preset for Addictive Drums 2.
Info View and Macros
Hover over any of SD Suite’s Macros to reveal information about their usage in Live’s Info View.
3
Drum Rack device
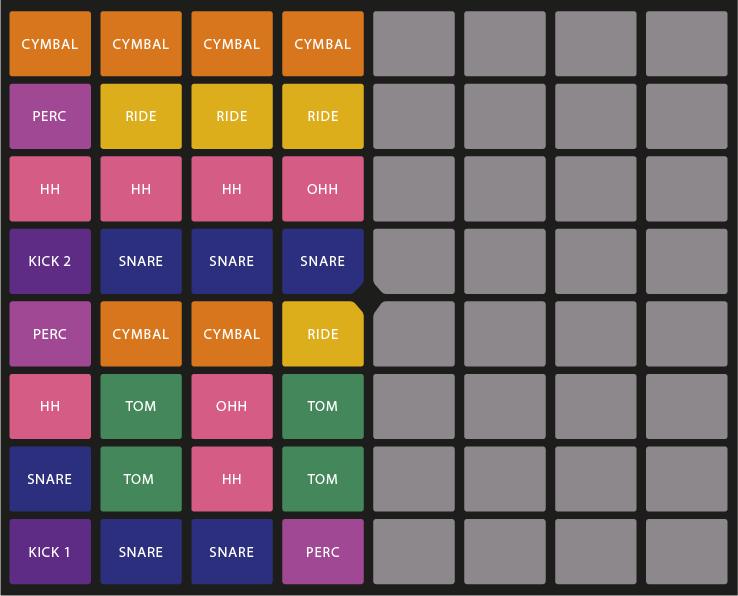
Like the original presets of the Session Drums packs, the SD Suite presets contain up to 32 pads with Sampler instances for realistic drum sounds. Hitting the keys C1 - G3 will - depending on the velocity value of the note - trigger samples with corresponding intensities.
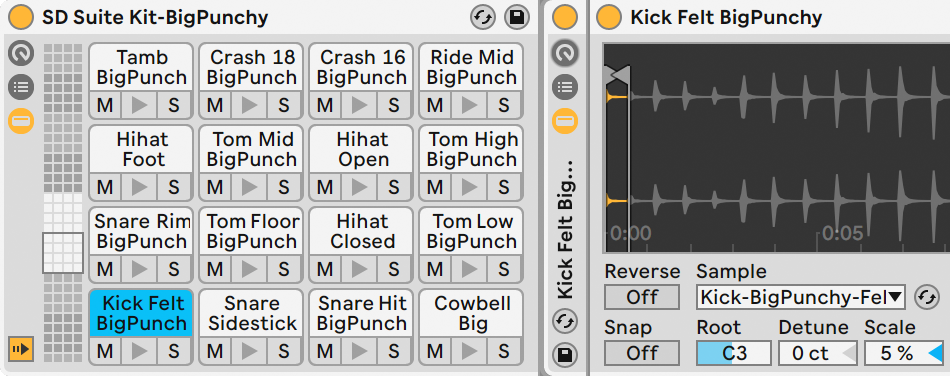
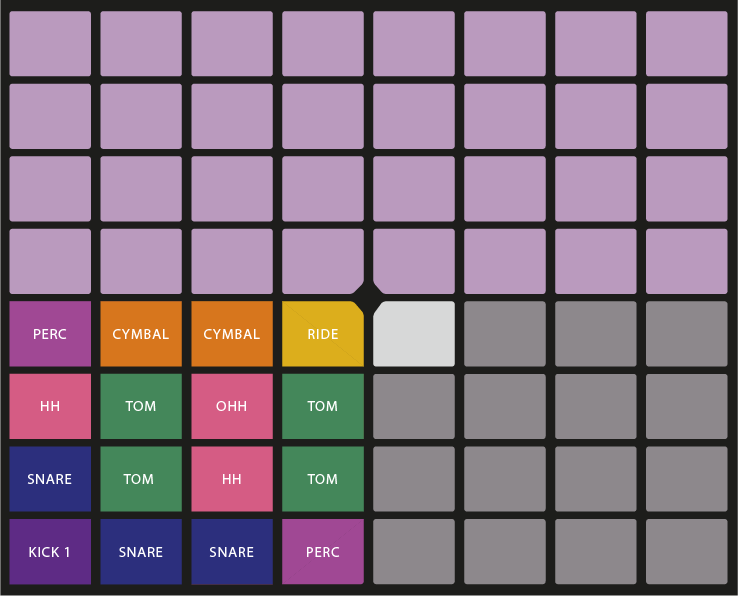
While in the Step Sequencer mode on Push, the bottom left 16 pads offer a collection of the main kit pieces so you can easily build the main beat. Switch to the 64 Pads mode to get access to all the other drum hits the presets have to offer.
In the images below you can see what each pad and color represents.
What happens inside
The SD Suite Drum Rack presets are very similar to the original presets, the only difference being the coloured and organised channels, and the addition of 3 default return channels.
By default all chains contain an Instrument Rack with a Sampler device and an EQ8, where both have several parameters mapped to the 8 Macros for easy access.

Choke groups
It is good to be aware that several chains of snares and hihats are assigned to choke groups. This can be adjusted when the IO section is enabled.

.
4
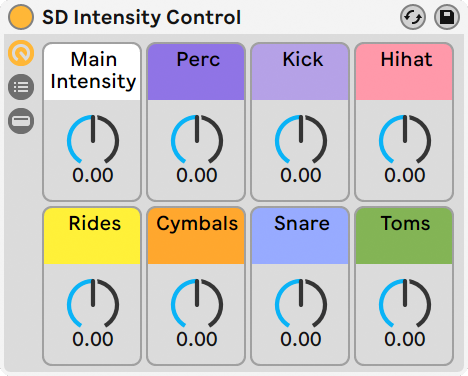
Intensity Control
The top 8 macro knobs in this MIDI Effect Rack control the Drive parameters of Ableton’s Velocity MIDI effect. Intensity Control houses 16 of these Velocity MIDI effects. Each of the instances have the “Drive” knob mapped to the different kit pieces. You can automate these knobs like any other, or map them to physical knobs on a MIDI controller.
The velocity values are randomized within the margin determined by the 8 macros in bottom row. For example: if the input velocity is 60, and the Macro is set to 10, the output value for each individual note is a random number between 50 and 70. This results in a more dynamic drum sound as a larger variety of samples with different intensities are triggered in the Drum Rack device.
What happens inside
Once the “Show Devices” button is switched on, two Velocity effects and another MIDI Effect Rack are revealed.
- Floor/Ceiling - The purpose of this device is to raise the minimum of all incoming velocity values to 7, and lower the maximum to 120. The reason for this is that the Drive parameter only increases or decreases the velocity values when those values are not near to 0 or 127.
- Main Intensity - The Drive parameter has been mapped to the Main Intensity Macro knob, enabling you to increase or decrease incoming velocity values for all incoming MIDI notes at once. This provides control over the intensity of the entire drum kit, even if MIDI clips contain notes with velocity values close to 0 or 127, thank to the Floor/Ceiling device.

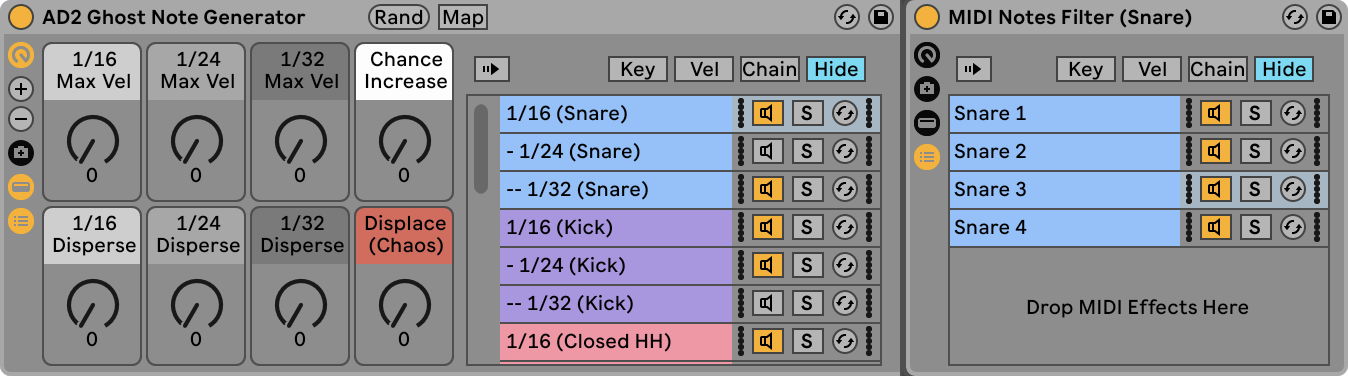
Intensity Key Map
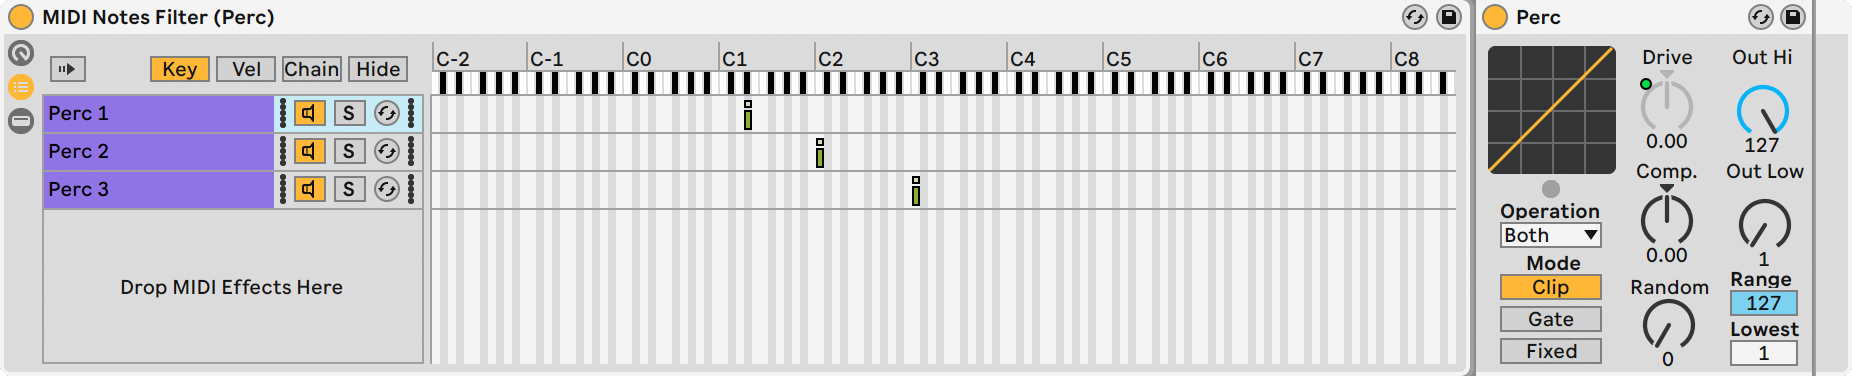
The Intensity Key Map MIDI Effect Rack houses seven Chains. On each chain (except the Kick) is another MIDI Effect Rack named MIDI Notes Filter, that filters out all notes that do not correspond with the kit piece at hand.
For this part, the Perc chain is used as an example:
There are 5 Chains inside the MIDI Notes Filter (Perc) device. This is because the notes that trigger the Perc are spread out over the Piano Roll, due to how the notes were mapped in Drum Rack. Since it’s impossible to split a key mapping Zone, multiple Chains and Zones had to be created in order to group all of the Perc notes together, so that the output will only contain the notes of the Perc. There are no devices inside the MIDI Notes Filter (Perc) device.
The remaining MIDI notes will pass through the Perc Velocity device of which the Drive parameter is mapped to the Perc Macro knob of the Intensity Key Map Rack device. That same Macro is then mapped to its parent Perc Macro.
This process is repeated for all the other kit pieces.
5
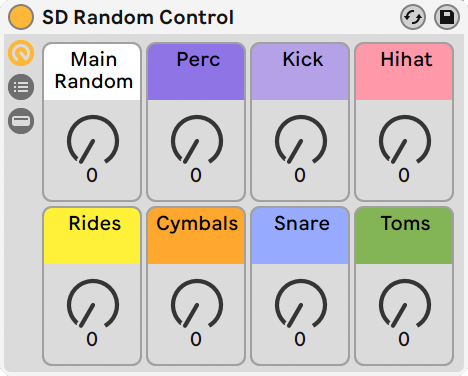
Random Control
Since this device is an exact copy of the SD Intensity Control (with the exception of the Floor/Ceiling Velocity effect), there isn’t much explaining to be done. The only real difference is that each Macro Knob is mapped to its related Velocity Random parameter, instead of the Drive parameter.
The velocity value is randomised within the margin determined by the Macro. For example: if the input velocity is 60, and the Macro is set to 10, the output value for each individual note is a random number between 50 and 70. This results in a more dynamic drum sound as a larger variety of samples with different intensities are triggered in the Drum Rack device.
6
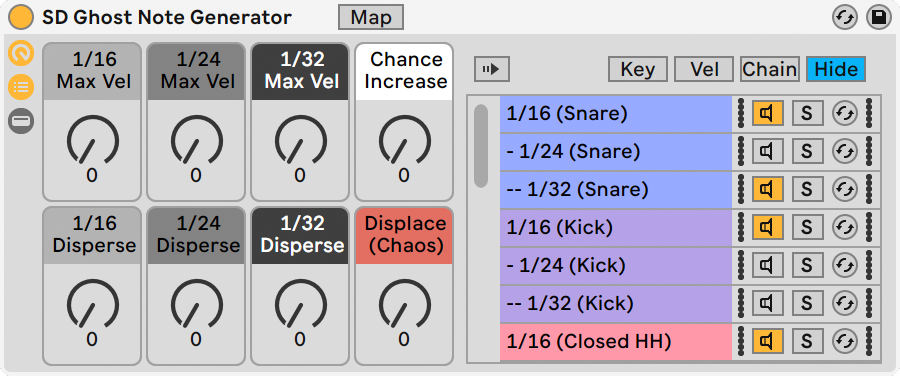
Ghost Note Generator
By default the Ghost Note Generator device does not generate any ghost notes. This is because the Max Velo(city) Macro’s have been set to 0. Increasing these values will determine what the highest possible velocity value will be for generated ghost notes, thus controlling the intensity of the added notes at the same time. The velocity values for the ghost notes will automatically be randomised slightly for a more realistic sound.
Chance Increase
As 1/24 and 1/32 ghost notes are more scarcely generated by default, opening this Macro will increase the chance that these divisions are generated.
Disperse
As the GNG generates its ghost notes using arpeggiators, a possible negative side effect is that you get a string of ghost notes, all playing in sequence. Disperse gets rid of this effect as every generated ghost note will go through a chance-based selector. The further you open the Macro, the more ghost notes will be dispersed.
Displace (Chaos)
This Macro randomises what kit pieces are triggered by generated ghost notes, thus inducing some form of chaos.
There are two factors at play which determine what MIDI notes are allowed to generate ghost notes.
- The first factor is the length of the initial MIDI notes. If an initial note is long enough so that multiple 1/16, 1/24 or 1/32 notes fit in its length, it will enable ghost notes to be generated for the duration of the initial note. For example, an initial note with the length of 1/4 has room for 4 1/16, 6 1/24 or 8 1/32 notes. Which division is generated is random.
- The second factor is whether the kit pieces and division Chains are activated or not. This can be done in the Chain List, right of the Macro Knobs. Kit pieces that are not in the list are not able to generate ghost notes.
What happens inside
The Max for Live LFO MIDI device is what is causing the randomisation. It is located in the Main Feed Chain, at the bottom of the list. The LFO modulates the Chain Selector at an a-musical rate, set to 0.64 Hertz. As the Chain Selector scrolls by, it generates 16th ghost notes all across at varying velocity values, while generating 24th and 32nd notes more rarely.
The Chance Increase Macro is mapped to the LFO’s Depth parameter. Turning the Macro narrows down the range of the Chain Selector, increasing the chance to generate 24th and 32nd notes for all enabled kit pieces. The LFO’s Rate also increases slightly as the Chance Increase Macro is turned clockwise.
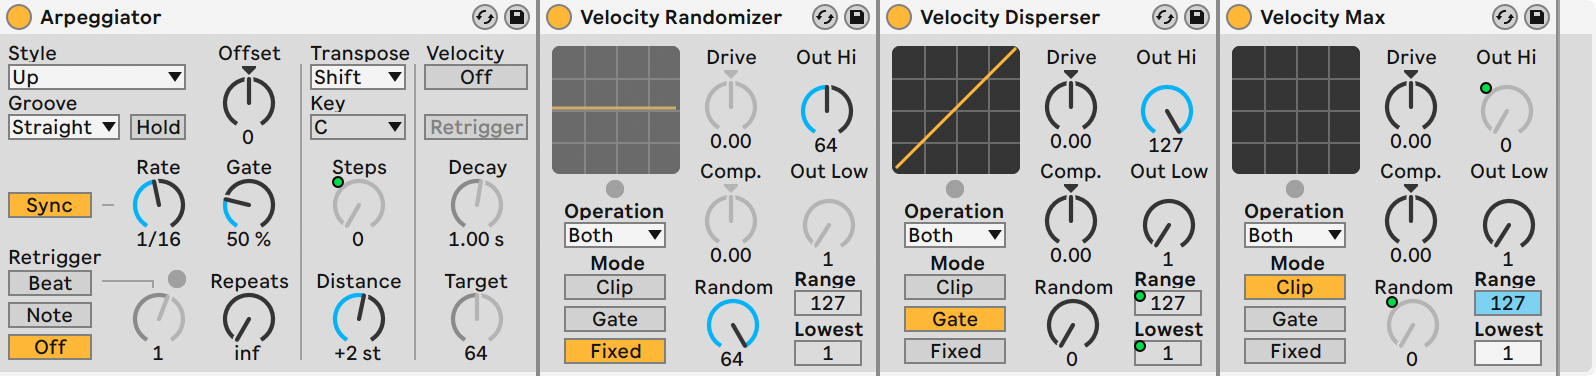
Inside the chains
All Chains but the Dry Chain contain an Arpeggiator with the Rate matching the Chain’s name. Whenever the Chain Selector scrolls by a Chain’s Zone, it are these arpeggiators that generate the ghost notes. Behind each Arpeggiator are three Velocity MIDI effects:
- Velocity Randomizer: sets the velocity value for all generated ghost notes to 64, and then fully randomises it between 0-127.
- Velocity Disperser: only lets through MIDI notes with a velocity value that falls within the allowed range.
- Velocity Max: determines the max output velocity value for the ghost notes, and slightly randomises the values for more realism.
Displace (Chaos)
This Macro is mapped to the Steps parameter of every Arpeggiator in GNG. The Distance parameter of the arpeggiators is set to +2 semitones. This means that for every generated ghost note (with the exception of the first ghost note), will be pitched up 2 semitones. The process re-triggers with every new initial MIDI note. Therefor, Displace (Chaos) has a stronger effect on long initial MIDI notes, especially 1/24 and 1/32 divisions, as they generate notes more frequently.
7
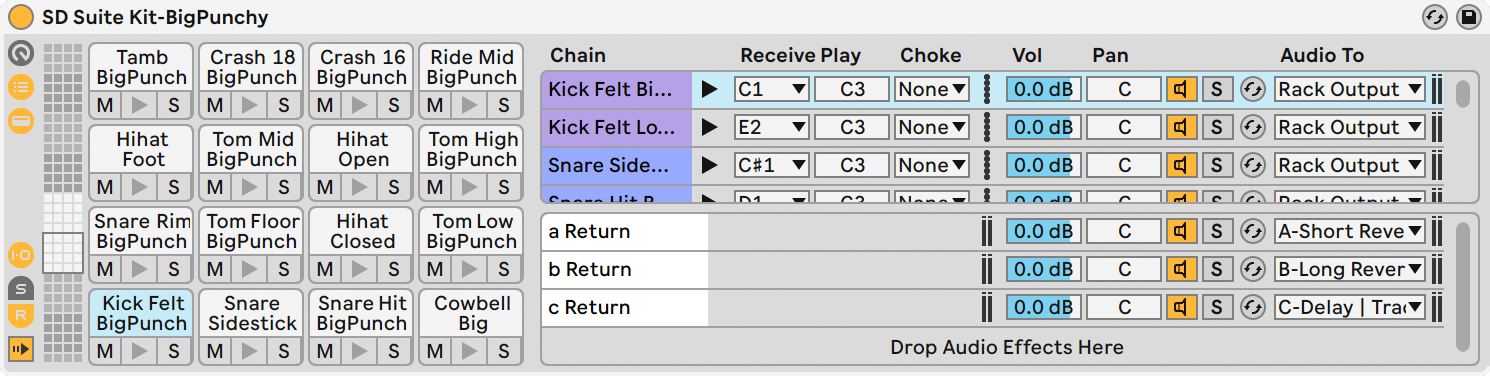
Using and forwarding Send / Return tracks
The Drum Rack device contains 3 internal send/return tracks. No effects have been loaded into them yet. You can either choose to keep them to work internally and use effects for the drumkit alone, or you can forward the audio signal to the project’s main return tracks. To do this, with the Chain List open, click on the I-O icon. Open the Return tracks with the R icon. Now that the Return tracks are in view, with the output menu on the right you can select to which Return tracks you’d like to forward the signal. If you need more or less Return tracks, it is safe to add or delete them. It won’t affect anything or require any additional setup.
8
LFO MIDI Workaround
If you do not own Max for Live, this means that the Chain Selector inside the Ghost Note Generator is not modulated as the LFO MIDI device is disabled. To counter this, modulation will have to be hand drawn inside an existing MIDI clip. An example is present in the “Basic beat” clip in the presets labeled “Without Max for Live”. Here’s how to do the workaround yourself:
- Open the Envelopes Box in the Clip Editor. In the Device Chooser menu, select SD Ghost Note Generator. In the Control Chooser, go for the Chain Selector, which is listed at the bottom.
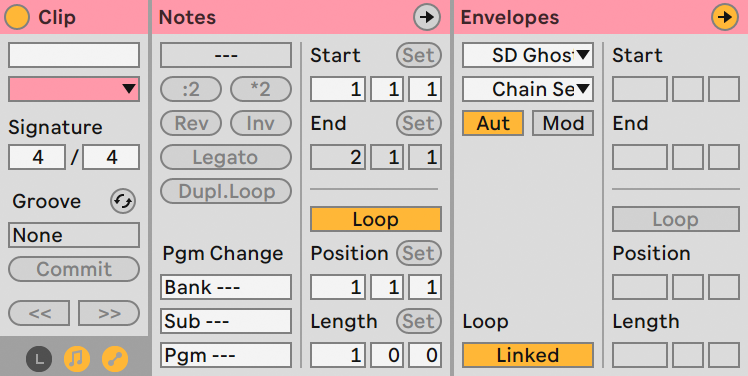
- Next, unlink the Envelope from the MIDI clip and set the duration of the envelope to an a-musical length.
- Finally, draw the Envelope in a sawtooth fashion. Start at the minimum, and end at the maximum.

The Chain Selector now has a red dote next to it, showing that it is now automated. Once you trigger the clip, the Ghost Note Generator will now generate ghost notes as intended.
Because the Chance Increase Macro is mapped to the LFO’s Rate and Depth parameters, this Macro will be disabled when Max for Live is not installed.
9
Changelog
V2.0 (November 30, 2022)
- AD2 Suite now uses the VST3 variant of Addictive Drums 2.
- AD2 Suite now requires Live 11.2.
- The Addictive Drums 2 plugin now uses the “AD2 Standard” mapping.
- The Intensity Control and Random Control devices have been combined into one, resulting in far less devices being used, and improving responsiveness of Live with larger Live Sets.
- Updated some of the colors used throughout AD2 Suite.
- Updated the online manual.
V1.5.3 (June 22, 2020)
- Updated the included LFO MIDI plug-in.
V1.5.2 (October 11, 2019)
- Reintroduced automation examples in every Basic Beat clip in the (without Max for Live) project.
- Optimized both Intensity Control and Random Control devices, resulting in a smaller number of total devices.
- Removed 4 scenes from both project files.
- Updated the online manual’s AD2 Intensity Control device chapter in regard to the new changes.
V1.5.1 (October 3, 2019)
- Repackaged download file format to Ableton Live Pack (.alp). The new file contains two project files serving as presets, the LFO MIDI.amxd file and URL files that lead to the online Manual, Changelog and Update Checker.
- Added info texts to all of AD2 Suite’s Macros. Hover over the Macros to read info about them in the Info View.
- Updated the online manual’s Installation chapter in regard to the new changes.
V1.5 (May 29, 2019)
- AD2 Suite now supports the Beats section inside the plug-in. When importing a MIDI pattern into Live, the mapping will be correct, unlike in previous versions. To achieve this, a custom MIDI mapping preset was added to the Addictive Drums 2 plug-in. When opening the Map Window in the plug-in, the name of the preset is displayed as “unknown”.
- The routing inside the AD2 Push Layout device has been changed to match the new MIDI mapping.
- Added one new Velocity effect to the AD2 Intensity Control device: “Floor/Ceiling”. For all incoming MIDI notes it raises the minimum velocity value to 7 and lowers the maximum value to 120. This ensures that the Drive parameters on the other Velocity devices WILL have an influence on all MIDI notes, while in previous versions this was not the case whenever notes had velocity values close to 0 or 127.
- Updated the online manual’s Installation, AD2 Push Layout device and AD2 Intensity Control device chapters in regard to the new changes.
V1.4 (February 28, 2019)
- For GNG, the Macros for Max Velocity and Random Velocity have been combined into one Macro for all three note divisions. The maximum random velocity for ghost notes is calibrated to 32 (above and below the maximum value).
- For GNG, The Chance Increase and LFO Rate Macro’s have been combined into one single Macro.
- For GNG, added new feature: Disperse. Opening the Disperse Macro’s will make generated ghost notes disperse across the duration of the initial MIDI note. It also makes it possible to use much longer MIDI notes. This way the ghost notes feel more impulsive, and less arpeggiated.
- For GNG, added a new feature: Displace (Chaos). Opening this Macro will add steps of +2 semitones in the arpeggiators that generate the ghost notes, resulting in unintentional kit pieces being triggered instead of the just the initial note’s corresponding kit piece.
- For GNG, reorganised and removed redundant devices in the primary Chains.
- In the project file without Max for Live, the Basic Beat clip now has the Chain Selector of the GNG automated by default to illustrate an example.
V1.3.1 (November 9, 2018)
- Added a second project file with presets for users who do not own Max for Live, as V1.3 wouldn’t load on Live Standard.
- Updated the online manual’s Installation chapter in regard to the new presets.
- Fixed a broken link in the attached Readme PDF.
V1.3 (April 8, 2018)
- For GNG: rearranged the Chain List.
- For the main Mixer in the Session View: all levels are now defaulted to 0dB.
V1.2 (March 29, 2018)
- For GNG: added Kick Chains for each division.
- For GNG: divided 1/16 (All) Chain into separate chains for similar functionality to the 1/24 and 1/32 chains.
- Updated the online manual’s Ghost Note Generator chapter in regard to the new features.
- Fixed some bugs in GNG.
V1.1 (March 20, 2018)
- Instead of 1 single Drum Rack channel, the AD2 Suite project now contains 3 channels/presets for AD2 Suite. One with all channels set to Pre-Fader outputs, one with Post-Fader outputs, and one Stereo channel preset.
- Updated the online manual’s Installation chapter in regard to the new presets.
- Minor audio routing bug fixes.
V1.0 (March 1, 2018)

About SoundSuite
SoundSuite creates tools, videos and lessons about anything involving electronic music production, Ableton Live and Push. SoundSuite is run by Jean-Paul Grobben, an Ableton Certified Trainer based in Amsterdam, Netherlands.
Contact Details
Comeniusstraat 225hs
1065BN, Amsterdam
The Netherlands
Mail@SoundSuite.nl
KVK 53753100